To Ifficial Blog Of Messian Dread

Saturday, September 13, 2014

(Un)Muting Channels and Using Echo (Making Dub With Computers Chapter 28)

MAKING DUB WITH COMPUTERS CHAPTER 28: (UN)MUTING CHANNELS AND USING ECHO
STUDIO DUBROOM TUTORIAL

Read Chapter 28 in Context

WWW, September 13 2014 - Create multitrack recording of instrumental Reggae track: check. Add effects and make a set up: check. Finalize it with a sound check: check! In principle we're ready to make our first Dub. At least, we're ready for an introduction into what this is all about: making Dub with computers. 

Dub is both a technique and a form of art. You can learn the techniques but without the art-istic approach it won't be much. On the other hand, creativity can so much be enhanced with just a little bit of technical knowledge. So, before we'll start to look in some actual techniques we really need to consider our actual artistic feelings and desires when it comes to Dub.

There are many, many different ways to start a Dub. We'll take a look at some of them later on in this tutorial. There's the thing, are you making a Dub of a track that is also to be released as a vocal, are you making a Dub for a single release or as part of a Dub album? All need a different approach. What is it you're trying to communicate with your mix? What are you trying to say with that one particular effect you're using? These questions should be answered in your final Dub.

Where there are so many different forms, styles and techniques in Dub, one thing that all good Dub has in common is the fact that the Dubs are remixes of full musical tracks, with or without vocals. Dub is the Art of taking away, and when there is nothing to take away, things become a bit weird. Dub is the art of transforming a musical track by the use of effects and changing of settings on mixing board and devices. You'll need a musical track to transform, even when you're never intending to release the original track you made the Dub from.

Before I make a Dub, I open the instrumental track in my DAW and save it under a different name. I usually give my riddims a number, like 201401master.rns which I then save as 201401mix01.rns just to help myself keeping track of what I do.

The actual Dub is made in exactly the same way as it would be done in a real studio, with a couple of extra features that were unable in the times when Dub came into existence. It means, that while the track is running you'll change sliders, knobs and everything else you can possibly change and record these changes. This is called automation and every serious DAW should have this possibility. Some programs require you to arm tracks for automation, others will automatically record movements on the mixing boards and devices. 

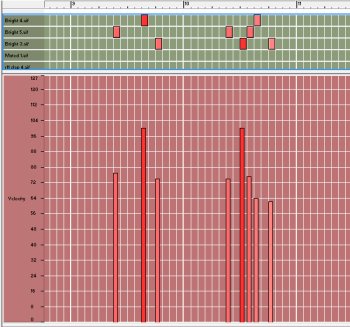
The last thing I do before I start recording my mix is to make an initial setting. Usually this means I mute every channel except for the drum, bass and effects (channels 11-14). When I don't do a thing, the drum and bass will just play. Only when I unmute another channel and/or mute channels 1/2 (drums/bass), you'll hear something else. 

I do this because one very important general rule is that the drum and the bass should be dominant, there should be many parts where it's just the drum and the bass (plus perhaps an echo), and there should be let's say at least three little parts in your mix where drum, bass, or both will drop out. You could call them "breaks", in a way. That was a tip I got very early on, a tip I gladly pass on.

Now, let's take a little version excursion: a first mix wherein some of the mentioned principles are being put into action. Let's just play a little bit with the track by muting and unmuting channels while channels 3-5 have a little Dub delay (aux 1). 

Take a look at the following video and also watch some basic use of the slider in channel 11, that basically functions as the echo volume:

CLICK HERE TO READ FURTHER


Friday, September 12, 2014

Finalizing the Set Up with A Soundcheck (Making Dub With Computers Chapter 27)

MAKING DUB WITH COMPUTERS CHAPTER 27: FINALIZING THE SET UP WITH A SOUNDCHECK
STUDIO DUBROOM TUTORIAL

Read Chapter 27 in Context

WWW, September 12 2014 - We have our instruments set up in proper sub mixes, we've added the effects for dubbing and for enhancement of the instrument's sounds, now it's time to actually enhance these sound and make a reasonable mix. We're going to do that in this chapter in word, sight and sound. Actually, this is pretty much the same as a live soundcheck just before a live performance by a band. 

Truth be told: I did a little bit of preparation by using some specific settings on both reverbs. In short, I use a longer, heavier reverb for the Dub mixing (the one at aux 2), and a short one for the instrument enhancement (aux 4). I've also set the Space Echo as a Space echo (aux 3) but we're not going to use that in the soundcheck itself. 

We'll start that soundcheck with the drums. It gets some extra EQ-ing, and a little bit of reverb. The bass is next, gets some extra EQ-ing as well. Then the skanks and the horns. Both submixes have their own phaser, and they are put in action. The balance between the instruments is made in the submix, and then the skanks and the horns are balance with the bass and drums. The last part is for the accompanying elements: the guitar and the clavinet. While you could also add a phaser to that submix, for this tutorial we'll leave it at that. 

I've made three temporal midi tracks for the horns, to make them play the theme all over again. After all, we have to make a setting. After the soundcheck, I reinstated to original horns track. 

This is the sound check, live and direct.


CLICK HERE TO READ FURTHER


Thursday, September 11, 2014

Finalizing the FX Set Up (Making Dub With Computers Chapter 26)

MAKING DUB WITH COMPUTERS CHAPTER 26: FINALIZING THE FX SET UP
STUDIO DUBROOM TUTORIAL

Read Chapter 26 in Context

WWW, September 11 2014 - The previous chapter gave us a little feeling about the Dub we're going to make later. We've set up a simple but effective Dub delay and this chapter we will add more effects. Before we will, though, let me separate between two kinds of effects and briefly explain their function in a studio where the purpose is to make DUB.

Let me exaggerate a little bit, just to make a point. Let's say that until DUB was first created (or perhaps even discovered by accident), effects like delay and reverb had the function to enhance the sound of instruments and singers. Still, in much form of musical recordings this is the way effects are used. With the introduction of DUB, the effects became instruments just as much as the engineer became a musician if you will.

I know, there's all kinds of "buts" and thing when it comes to the actual historical unicity of DUB when it comes to the transformation of effects from enhancements to instruments if you will, but for this tutorial it's more than perfect and the reason for that is, that you actually want effects that enhance the instruments while you want to keep playing with other effects. 

In our case, we will use a reverb which we'll apply just a little bit on every channel where we'll use the reverb we already created as a Dub reverb. We will also add just one more effect, preferably some sort of simulation of the Roland Space Echo. An echo device that in itself lets you do all kinds of weird things. When you do not use Reason 3.04 or up, you could use some kind of VST effect or something like that. It doesn't really matter, after all it is your inspiration and choice of effects that will make your sound. This is merely a guideline. 

We'll put the Space Echo on Aux 3 and the Reverb we'll use you enhance the sound of the instruments at aux 4. Make sure (if possible), you select aux 4 to Pre rather than Post. When you do so, opening aux 4 will give signal to the Reverb device even when the channel's volume slider is put all the way down. When you select "post", the volume of the aux out will correspond with the volume on the channel volume slider.

We'll also add two phasers. Or three, if you like. Since we made sub mixes, it should be possible to send an aux out from that sub mix to an effect device and route it back to the submix. We'll add a phaser to the horns and the skanks submixes. This will give us a phased skanks and horns rather than dry ones. It's just a little bit nice. Of course, you could add another effect like a filter or flanger, chorus, what have you. 

Take a look at the following video, where you can see everything in action. It sounds more complicated than it actually is, once you discover the logicalities behind everything. Remember, what we're doing is making it as easy as possible for ourselves so that when we're Dubbing we don't have to worry about anything else.

CLICK HERE TO READ AND WATCH AND LISTEN FURTHER


Wednesday, September 10, 2014

A Simple, But Effective Dub Delay And Reverb (Making Dub With Computers Tutorial Chapter 25)

MAKING DUB WITH COMPUTERS CHAPTER 25: A SIMPLE BUT EFFECTIVE DUB DELAY AND REVERB
STUDIO DUBROOM DOWNLOAD

Read Chapter 25 in Context

WWW, September 10 2014 - With five input channels at our master mixing board ready to be processed, it's time to add the effects. Before we'll dive a little deeper in fine tuning and stuff, though, we'll add a delay and a reverb which we'll use later in the Dub mixing. You will see why the returns on the mixing board are of little to no use: after all, they're just inputs without any other possibilities attached to them. 

It's best to set up the effects according to the following principle: Aux 1 goes to an effect, the output of the effect lands in channel 11 at the mixing board. Aux 2 to channel 12, aux 3 to channel 13 and aux 4 to channel 14. Take a good look at the following video, where you will see (and hear) all of this explained in about four minutes:

By not using any feedback in the delay itself but rather looping it back to a channel, you give yourself full control over the echo's. Unless you really want to have that specific effect, a Dub echo is not just a repeat of itself. The flow of an echo changes, for example by applying certain EQ on the echo's channel input or -as was done in the video- by adding reverb over the echo. And that's what you want: you want to add layers of effects on top of each other. 

Bypass the whole return options. Rather treat the effect devices as instruments by giving them their own input channel. By doing so, you have established a potential of countless different effects. You can add EQ over a Reverb, Reverb over a delay, or make even a four layer effect in an instant during your Dub mixing session. Makes it spontaneous instead of pre-programmed.

CLICK HERE TO READ, WATCH AND LISTEN FURTHER TO CHAPTER 25


Tuesday, September 9, 2014

Making Dub With Compters Chapter 24: Sub Mixes

MAKING DUB WITH COMPUTERS CHAPTER 24: SUB MIXES
STUDIO DUBROOM DOWNLOAD

Read Chapter 24

WWW, September 8 2014- Continuing our preparation for the first Dub session. This chapter deals with sub mixes and why they are a good option.

On top of that, you'll find a number of downloads that will help you further. 

CLICK HERE TO READ, WATCH AND LISTEN FURTHER TO CHAPTER 24


Monday, September 8, 2014

Making Dub With Computers Chapters 22 and 23: Concluding MIDI, Talking Software Requirements

MAKING DUB WITH COMPUTERS CHAPTERS 22 AND 23: CONCLUDING MIDI, TALKING SOFTWARE REQUIREMENTS
STUDIO DUBROOM DOWNLOAD

Read Chapter 22 and 23

WWW, September 8 2014 - A Couple of days ago, I published chapter 21 of my Computer Dub Tutorial and today I offer you two new chapters, one of which you can read in it's fullness on this page. We're concluding the MIDI part, the phase wherein we make an instrumental Reggae track because if you don't have that, well, you can't make (a) Dub. We're taking a look at what kind of software you need, and a little bit at hardware too.

Since you are reading this, you're probably visiting one of the Dubroom's blogs or the forum. That could mean you are waiting for chapters to be added. I'm sure you don't mind me writing a few personal notes before I paste chapter 22 and a part of 23 into this post. The fact I receive a lot of positive feedback from producers all over the world lately makes me humble once more, as I realize how much more I should add, and -Jah Willing- shall add chapters. I do take this serious, even though I am aware that the things I know in themselves are in it's turn a fraction of what people like Mad Professor know.

One good thing about this tutorial, is the fact that it is located on the Dubroom website. I only post fragments of chapters because the tutorial really needs to be studied from the pages. As I'm working on new chapters, I equally look at the older ones and I plan to add a lot of extra information as time progresses. I also now have the possibility to record video and audio from my computer screen and sound card, which I am sure will be most helpful when we will finally arrive there, where it's all about: the DUB.

All that said, here's the latest additions to the tutorial:

PART 22: MIDI (12) - THAT'S WHY MIDI

In the previous chapter we added the last instruments to our instrumental Reggae track. A track, we created with the use of the MIDI protocol. En passant we've been taking a close look just how a Reggae rhythm is constructed, how you can find a good bass line with your chords or vice versa, and a whole heap more. We're into the 22nd chapter, and actually all we have been doing is laying a ground work for future Dub projects. All we have been doing is creating an instrumental Reggae track with total disregard of any sound balance, and so the track sounds awful. That's what we're going to be working on in the next few chapters.

When I started to write this tutorial I was dealing with like the first generation Audio cards that needed quite a specific set-up. I remember that I had to physically open my computer and change things so that two sound cards could work on one computer, even. In the same time, the way I made my Dub was totally different in these times. It would take me over 5 minutes to create just one echo. 

When I discovered Propellerhead Reason, my working method completely changed. What did not change was the fact that I made my instrumental Reggae tracks with midi (and a few audio loops). In spite of all the developments, what has not changed in making Dub with (or without) a computer is the fact that you'll need something to Dub and usually that would be an instrumental Reggae track, or a multi track recording of a Reggae track with, let's say, vocals on them. 

So, in a way, it's very good that it took such a long time before we're actually in this part of the tutorial. I don't have to introduce you to a working method that requires more than patience, self control and what have you.

We will still be using the MIDI protocol throughout the entire tutorial. It can't be different, because what we have been doing by creating the music is the very same thing what we will be doing when we're actually in the Dub phase. After all, because of Midi we can give instructions to not just a keyboard, but a mixing board, effect devices and all the things we'll be using. Because of MIDI we can make Dub with computers in the first place.

However, it is time to make some closing remarks about this segment of the tutorial. We have been creating an instrumental Reggae track, even though it's not the next Reggae world hit. You now know why MIDI is a very important part in the creation of music, any music. You know now how to make your own instrumental Reggae track.

We now have to use this track and turn it into a Dub track, something we'll be doing in the next chapters.

PART 23: CREATING A SET UP (1): SOFTWARE REQUIREMENTS

Now that we have our instrumental, you could say that we have a multi-track recording. We have several different instruments all playing their musical part over their own channel on the mixing board. By putting one instrument louder than the other, you create a mix. By adding effects like delay and reverb to the mixing board, you're ready to make a Dub. 

In short, that is.

To create the instrumental track we've programmed in the last chapter, I have been using Reason 3.04. Now, in September 2014, this is a rather dated version of the superb software by Propellerhead. Add to that, there is software called Ableton which I have started to look at in this year as well but about which I know close to nothing. Add to that the countless other titles in music software, and the -often totally irrelevant- question which software to use, and you have a problem when you're writing how to create Dub with computers.

The software.

Let me describe just what I'll be using Reason 3.04 for in the next chapters, in more general terms. This will not just enable you to go along in this tutorial as you make a set up in your favorite software title, it will enable you to obtain the right software in case you are wondering just what to use. Since the version of Reason I use is not the latest, I suspect that there are a lot of titles that will give you the features required for this tutorial. Probably even free titles. When you know of a few, let me know and I'll add them to this tutorial somewhere.

In short, what you need is a title that enables you to simulate everything you would do when you would have a physical studio with hardware. You want to have a mixing board with instruments and effects devices attached, at least four aux-outputs, and you want to be able to change any setting on any device at anytime. This is called "automation".

Here's a check-list:

CLICK HERE TO READ, WATCH AND LISTEN FURTHER TO CHAPTER 23


Friday, September 5, 2014

Making Dub With Computers Chapter 21: Reggae Percussion, Clavinet and the Pucking Guitar

MAKING DUB WITH COMPUTERS CHAPTER 21: PERCUSSION, CLAVINET AND PUCKING GUITAR
STUDIO DUBROOM DOWNLOAD

Read

WWW, September 2014 - Slowly but steadily, we're progressing with the unfinished tutorial on making Dub with computers. In chapter 21, we'll take an in-depth look at Reggae percussion, and the clavinet and the pucking guitar. This is the final chapter about midi instruments, by the way.

Chapter 21 is huge. Huge, in the sense of long and in-depth. It has several download links, a You tube video, screenshots and audio examples as we dive in especially Reggae percussion. It's a chapter where the function of the hand drum and other percussion instruments are explained while principals are revealed as well. We're also adding a final touch to the music by taking a look at the clavinet and the pucking guitar. This is a chapter for the serious scholar, not for ones seeking to click their own supermix in a quarter of an hour. 

CLICK HERE TO READ, WATCH AND LISTEN TO CHAPTER 21


Visit The Dubroom!

Our NETLABEL releases music from the Dubroom Studio and that of others and our WEBSTORE has some interesting releases too. We also have tons of REVIEWS on MP3's, VIDEO's, ALBUMS, BOOKS, WEBSITES, and MORE. Especially for the (online) artists, there is an artists-only STUDIO. Additionally, we have several research and information websites on BABYLON, CHRISTIANITY, and RASTAFARI. Also check out our ARTICLES and get in touch with other visitors on our MESSAGE BOARD. Or stay up-to-date by subscribing to one or more of our MAILING LISTS. Find all Dubroom features at our SITE MAP. When something is unclear, you can always check our FAQ or use the search engine to find what you're looking for. And ofcourse, you can allways CONTACT us.